The Audio Graphical User Interface (GUI)

Open an audio file:
Click on the  buttton
or select the menu File -> Sound -> Open.
buttton
or select the menu File -> Sound -> Open.
Supported file formats: wav, flac, mp3,
wma (Windows only), and m4a (Windows & macOS).
Save an audio file:
Click on the  buttton
or select the menu File -> Sound -> Save As.
buttton
or select the menu File -> Sound -> Save As.
If no file is associated with the current audio track, a file chooser opens
for selecting the output file.
Supported file formats: wav and flac .
Save As an audio file:
Same as Save but open a file chooser in any case.
Click on the  buttton
or select the menu File -> Sound -> Save As.
buttton
or select the menu File -> Sound -> Save As.
File Informations (metadata):
Click on the  buttton to edit
the audio track informations (Title, Author, ...).
buttton to edit
the audio track informations (Title, Author, ...).
Clear The Current Audio Tract:
Click on the  buttton
Zoom: Draw a rectangle in the graphic area to select the new area boundaties. If the rectangle is nearly an horizontal line, vertical boundaries remain unchanged. If it is nearly a vertical line, horizontal boundaries remain unchanged. 💡 If the time interval of the region is small enough, samples are displayed.
Select an audio region: Click with the left mouse button in the graphic view
to select the start point (red cursor)
and click while holding the Ctrl key (Cmd on Mac) to select
the end point (blue cursor). The lenght of the region dt is
plotted on the top
of the graphic area as well as the corresponging frequency (1./dt).
The  button puts the start cursor at the begin of the signal and the
 puts it at the end.
Edit an audio region: Once a region is selected, edit it by Right Clicking in the view and then Click on the Edit menu (see picture below). Before pasting, put the start cursor (red) at the desired position.
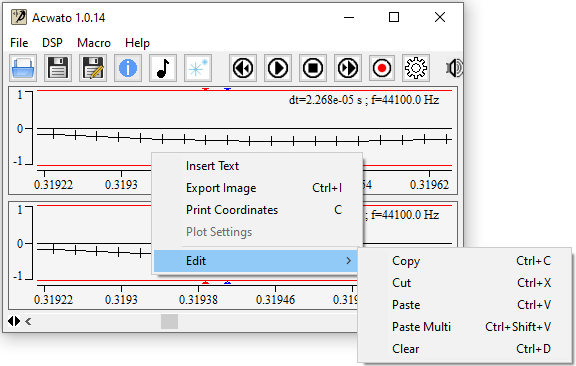
Paste Multi allows you to paste several instance of the selected region. You will be asked the number of repetition.
💡 The view menu also allows you to insert text, export image and print the coordinates of the mouse position while it moves.
Playback: The  button starts the audio playback.
💡 When clicking in signal view while playing, it stops and immediately restarts playing at the position where the click occured, smoothing the signal when stopping and restarting to avoid crackling.
Record: The  button starts recording audio.
Stop: The  button stops the audio playback or recording.
Fast Backward: The
button to put the cursor at the begin of the signal.
Fast Forward: The
button to put the cursor at the end of the signal.
Volume and Balance: The two sliders beside the
 icon adjust the Volume
of the audio output and the Sound Balance for left and right channels.
icon adjust the Volume
of the audio output and the Sound Balance for left and right channels.
Clicking on the  button in the Audio GUI opens the Signal Generator.
It allows to generate a signal that is the sum of an arbitrary number of sine waves and/or a white noise
when
clicking on the Apply button.
button in the Audio GUI opens the Signal Generator.
It allows to generate a signal that is the sum of an arbitrary number of sine waves and/or a white noise
when
clicking on the Apply button.
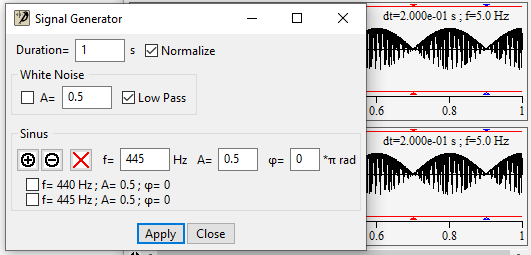
The duration in seconds is set in the top left entry. If Normalize is checked, each signal amplitude is divided by the number of signals.
If White Noise is checked, a white noise with amplitude A is generate using a random number generator and added to the sine waves.
If Low Pass is checked, a Kaiser window low pass filter is applied to the noise signal. The filter stop frequency fs is the Nyquist frequency: 0.5*(Sample Rate) and the pass frequency is fs*20000/22050.
If the default Bit Depth is less than or equal to 16, the filter attenuation is set to 96.3 dB. It is set to 144.5 dB if Bit Depth is equal to 24.
The  button
adds a sinusoid of frequency f, amplitude A and phase φ.
The
button
adds a sinusoid of frequency f, amplitude A and phase φ.
The  button
remove selected sine waves and the
button
remove selected sine waves and the  button removes all entries.
The Settings dialog box opens when the ![]() button is pressed in the Audio GUI.
button is pressed in the Audio GUI.
⚠
The  button is shown only if a loopback device
has been detected (Windows Only). When clicked, it provides infromation on how to setup
Loopback Recording.
button is shown only if a loopback device
has been detected (Windows Only). When clicked, it provides infromation on how to setup
Loopback Recording.
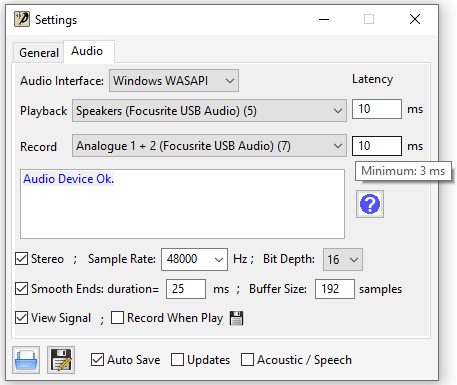
For each Audio Interface available on your system, you can select a Playback and a Recording device. If both devices work properly with the selected Sample Rate, an Ok message is prompted in the information area below the devices. Otherwise, an error message should help you to fix the issue.
Playback latency is the delay (in milliseconds) between when an audio signal
is sent to the audio device and when it emerges from your speakers.
Recording latency is the delay between when an audio signal
is captured by a microphone and when it is received by the application.
Latencies can vary a lot from on device to another.
The minimum value is shown when you hover on the Latency entry as shown in
the figure. The default is set to the High
Default Latency proposed by the audio driver.
⚠
If you hear crackling, you may need to increase the Latency
or decrease the Buffer Size.
⚠
If you are using high order real-time DSP filters, you may also need
to increase the Playback Latency.
Set the number of audio channels to 2 if checked and to 1 (mono) otherwise.
Set the sample rate used by the application.
The sample rate is number of samples per second obtained when extracting a discrete-time signal from a
continuous-time signal.
You can either select a value in the list or add a new one.
⚠ Some audio devices does not
support any sample rate.
If the sample rate is not supported by the selected device, an error message will
appear int the Audio Settings information area.
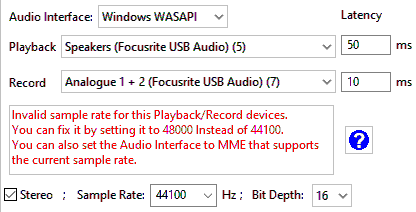
In that case, the
and buttons are disabled
and you have to change the sample rate or the audio device to enable
playback and recording.
If the audio track is not empty, the Set Sample Rate dialog opens.
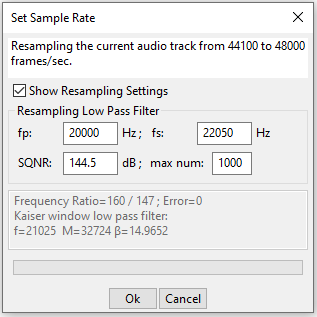
Pressing the Ok button will resample your audio track using fast and accurate conversion thanks to 64-bit multirate signal processing.
Though the defaults resampling parameters should be correct for most of the cases, you can modify them by selecting Show Resampling Settings.
The ratio between the two sample rates must be a rational number and the max num entry sets the maximum integer for the numerator. In the example used here, it will convert 44100 Hz to 48000 Hz and the ratio (output/input) is 48000/44100 = 160/147. Since the two sides of the = are strictly equal and the numerator (160) is smaller than max num there will be no distortion on resulting signal.
The resampling algorithm consists in over sampling by a factor 160, apply a low pass Kaiser window filter and eventually under sampling by a factor 147.
The parameters of the Kaiser window filter obtained from the user inputs are written in the info field below. In the example, SQNR requirement (see Bit Depth) is set for a 24-bit audio file. The computation time is proportional to the M parameter.
Allows the user to set the number of bit of information in each sample used when saving an audio file (8, 16 or 24).
⚠ This affects the Signal to Quantization Noise Ratio SQNR which is about 6.02*(Bit Depth). It reflects the relationship between the maximum nominal signal strength and the quantization error (also known as quantization noise) introduced in the analog-to-digital conversion. As example, the Compact Disct Digital Audio uses 16 bits per sample and the corresponding SQNR is 96.3. The human ear dyamic range is about 120 dB.
Avoid crackling when playing an audio track that have been edited with Cut or Paste. If it is checked when cutting or copying a signal sample, the volume of the begin of the sample is set to zero and smoothed to the original volume after the duration than can be set in the entry beside the check box.
The same processing is applied when clicking in the view while audio is playing.
The number of samples per buffer sent to or received from the audio device. The corresponding duration: 1000*(buffer size)/(sample rate) ms must be smaller than the latency.
View or Hide the signal view.
The output of the playback including real-time DSP is stored in the output file selected
with the button beside.
When the button is clicked in
Audio Settings, the following dialog box opens.
It tells you which audio interface and device allows Loopback Recording.
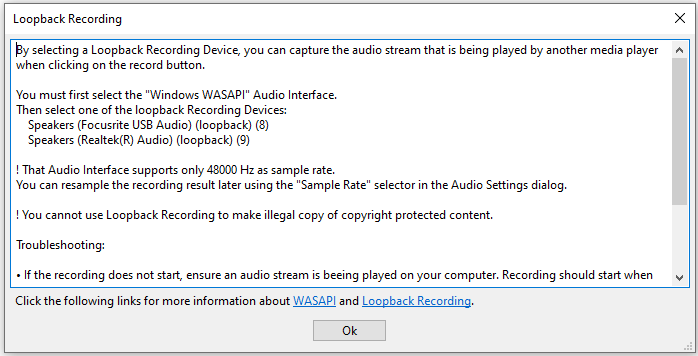
The Windows Audio Session API (WASAPI) Audio Interface may support a single sample rate
that you have to select in order to use the interface,
the
and buttons are disabled otherwise.
You can easily resample your recording later.
⚠ If the recording does not start,
ensure an audio stream is beeing played on your computer.
Otherwise, if you have more than on loopback device, try swicthing to another one.
When the application is waiting for audio stream inputs,
the record button becomes  and comes back to when an audio stream starts.
If the audio stream beeing played by the other media is stopped,
the recorder is still waiting for audio data, the record button becomes
and you have to click on the
button for stopping the recording thread.
Here are the Microsoft documentation links about the WASAPI and Loopback Recording.
This file format is dedicated to researchers or engineers who would like to listen
to the result of their unsteady numerical simulations.
It allows you to save your data as they are and load it as an audio file.
When loading the file, your field data will be resampled to a sample rate supported by any audio device (e.g. 44100 or 48000 Hz).
If necessary, your field values will also be linearly rescaled in order to lie within the range [-1,1] required for an audio signal. If they are not in the range [-1,1], the first field value V0 is mapped to 0. If the difference between the highest value Vmax and V0 is larger than the difference between the lowest value Vmin and V0, Vmax is mapped to 1. Otherwise Vmin is be mapped to -1.
The binary file must have a .f2a extension and contain the following data:
Field values must be ordered the following way:
| Time Step 1 Channel 1 |
Time Step 1 Channel 2 |
Time Step 2 Channel 1 |
Time Step 2 Channel 2 |
.... | Time Step NS Channel 1 |
Time Step NS Channel 2 |
|---|
Below is an example of C++ code for writing such file:
     void write_f2a(std::string fileName, unsigned int NS,
     unsigned int NC, unsigned int SR,
     unsigned int audioSR, float* fieldValues)
     {
        ofstream ofile;
        ofile.open(fileName.data(), ios::out | ios::binary);
        ofile.write("FLOAT_TO_AUDIO", 14);
        ofile.write((char*)&NS, 4);
        ofile.write((char*)&NC, 4);
        ofile.write((char*)&SR, 4);
        ofile.write((char*)&audioSR, 4);
        ofile.write((char*)&fieldValues, 4*NS*NC);
    }
Once your file is loaded, you can duplicate a period of your signal using
Paste Multi.
⚠
Smooth Ends must be unchecked in
Audio Settings for this operation.
If the signal extract that you duplicate or its derivative is not almost periodic,
it will generate noise that can be reduced by applying a
Kaiser Window (FIR) linear-phase
low pass filter.
You can also use a Butterworth low-pass filter
(IIR) but
with the 0φ checkbox selected in the DSP filter dialog box in
order to avoid
group delay in the resulting signal.
Here are the functions that can be called from Python scripts.
#### Audio Files ####.
OpenSoundFile(string "fileName")
SaveSoundFile()
SaveSoundFileAs(string "fileName")
ClearSound()
            AddSoundTrackInfo(string "tag",string "content", int position)

#  example: AddSoundTrackInfo("TITLE", "My Song", 0)
#### Audio Edit ####.
            SetSignalCursorStart(float position, int channel)
               SetSignalCursorEnd(float position, int channel)

# position in sec ; channel: 0 => Left ; 1 => Right
SignalCopy() # Copy the current selecttion
SignalCut() # Cut the current selecttion
SignalPaste(float position, int n) # optional n = number of repetition.
#### Audio Control ####.
PlaySound(float start, float end)
            # Optional start and end arguments corresponding to

# mouse click in the view while audio is playing.
RecordSound(float duration)
WaitSoundThread(float duration)
            # Wait the running audio thread (playback or record)

# has end before continuing python script execution.

# The duration should be a little longer that

# the expected thread duration: 0.2s when

# python script is saved by the GUI.
RewindSound() # Fast Backward
ForwardSound() # Fast Forward
SetSoundVolume(float value, float time) # 0 ≤ value ≤ 1.
SetSoundBalance(float value, float time) # 0 ≤ value ≤ 1.
            # Optional time for the SetSoundVolume and SetSoundBalance functions

# while audio is playing.

# Set the time when the value has to be applied.

# It corresponds to left mous release when

# adjusting the Volume or Balance in the GUI.
#### Sine Wave and White Noise Generator ####.
SoundGeneratorOpen() # Opens dialog.
SoundGeneratorSetDuration(float duration)
SoundGeneratorAddSinus(float frequency, float amplitude, float phase)
SoundGeneratorSetWhiteNoise(int b) # b=0 → false; b != 0 → true
SoundGeneratorSetWhiteNoiseAmplitude(float amplitude)
SoundGeneratorSetLowPass(int b) # b=0 → false; b != 0 → true
SoundGeneratorDeleteSinus(int index1, int index2, ....)
SoundGeneratorClearSinus()
SoundGeneratorApply()
#### Audio Settings ####.
SetSoundOutputLatency(float latency)
SetSoundInputLatency(float latency)
SetSoundStereo(int b) # b=0 → mono; b != 0 → stereo
SetSampleRate(float sampleRate, float sqnr, int maxNum, float passBand, float stopBand)
            # If the 4 last optional arguments are present, they set the parameters

# of the low pass filter used by the resampling algorithm.
SetSoundBitPerSample(int bitDepth)
            SetSmoothSignalEnds(int b) # b != 0 →
            smooth ends; b = 0  → don't smooth
SetSmoothEndDuration(float duration)
SetSoundFramePerBuffer(int bufferSize)
            ViewSignal(int b)  # b != 0 →
            view signal; b = 0  → hide
            RecordWhenPlay(int b) # b != 0 →
            true; b = 0  → false
            ####################################################

# Functions that have no GUI equivalent.
            get_sample_rate()
            # returns the sample rate.
            get_input_latency()
            # returns the input latency.
            get_output_latency()
            # returns the output latency.